Follow our 5 simple steps and we’ll have your site setup on the CloudFlare network in no time at all. With zero downtime too!
Move DNS to CloudFlare
1 – Open a CloudFlare Account
2- Scan your domain
3 – Check DNS records
4 – Update nameservers
5 – Wait one hour…
The first step is to get your domain over into the CloudFlare System. This means moving the nameservers from your existing registrar or your cPanel over to the actual CloudFlare assigned nameservers. So, the domain I’m going to working with is a test domain called DangerousMinds.org, that’s the real TLD, one of the newer one’s available that are very cheap if you need a test domain.
As it was registered with NameCheap the nameservers are initially set up to NameCheap defaults, most registrar provide default nameservers and your domain is probably set up with those.
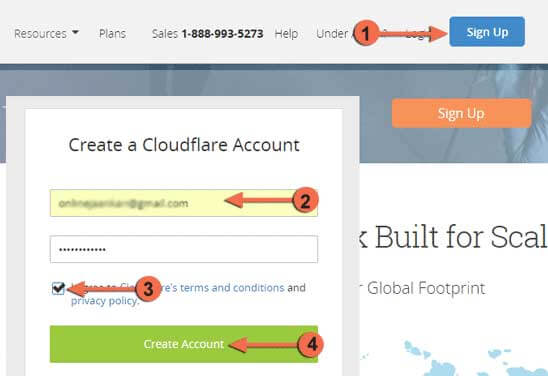
Next head over to the CloudFlare webpage, CloudFlare.com, and on this page you’ll see a signup now button, click on that and you’ll see a form that asks for your email and a password. You also have to agree the Terms and Conditions to create an account.
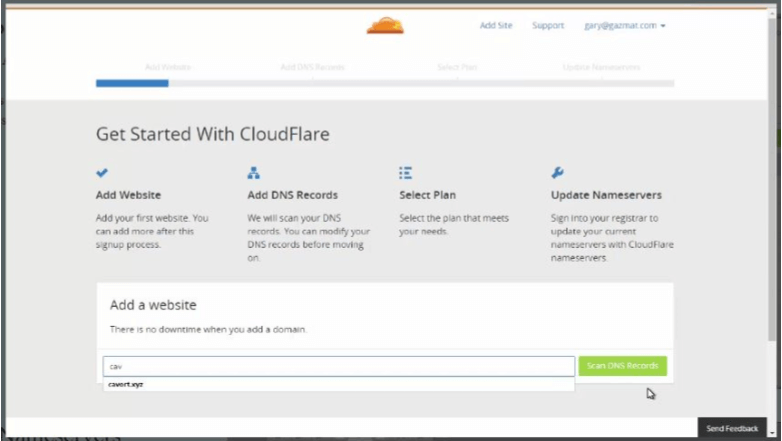
You’ll receive a confirmation email with a link to click on to confirm your account and you’ll be in. When you get there, you can see “Get Started With CloudFlare” screen which asks you to add a new website.
Type in the domain at the bottom under “Add a Website”, then click “Scan DNS Records” button. Once you click this the CloudFlare System is going to go out to NameCheap to check all the existing DNS records and copy them over into the CloudFlare System.
The system won’t make any changes yet, it will just make it a direct copy, then you can manually update CloudFlare when you’re ready.
The next screen also plays an introduction video telling exactly what happened, it’s quite useful to take a minute and watch as it explains what’s happening .
Once the process is finished a green “Continue” button will appear, simply click on this to get to the next page where CloudFlare will ask you to verify the all DNS Records that it has found are correct, and are pointing to the correct place.
To make sure there are no interruptions to your websites or any services copy all your current DNS records ready to switch over in the next
It’s important to have everything so look very carefully.
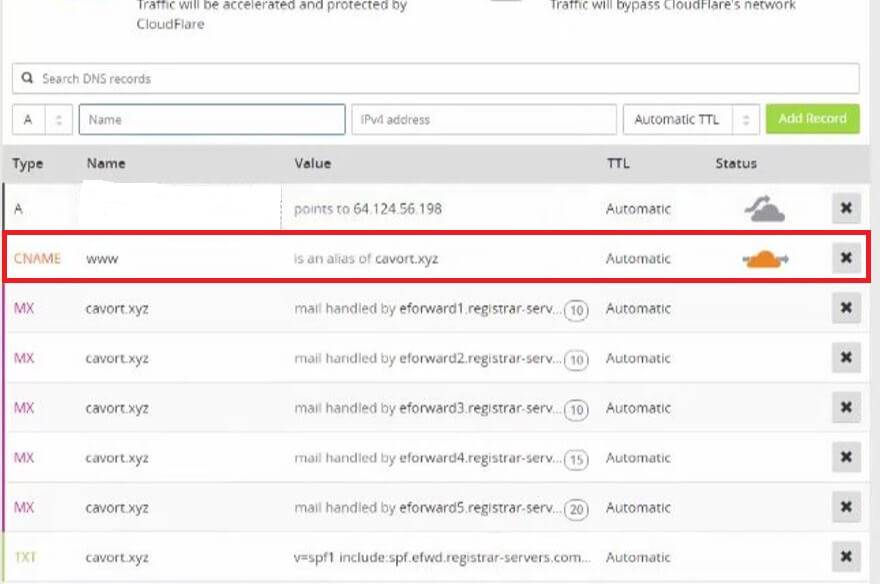
Here we have a CName and the www and MX Records.
What is sometimes missing is an “A” Record, which is the main record to point out your domain to the hosting server.
You can manually add an “A” Record by choosing “A” from the drop down list, put “@” in the “Name” field, input the IP Address for your domain, and choose “Automatic TTL”, then lick “Add Record”, as per the screenshot above.
The little symbols are important, there’s an orange cloud and a gray cloud. The gray cloud means the traffic is bypassing the CloudFlare service, which is not what we want, so where you have a gray cloud icon simply click on it to turn it orange to make sure the traffic is going through CloudFlare.
This should be done for your “A” record and your “CNAME” record. This ensures you get all the security and all the extra speed features of using CloudFlare.
Then simply scroll down the screen and click on the green “Continue” button. Next you need to choose your plan.
There’s a several plans available here, but you can use the Free Website, which gives you all the security and speed you need. Then click on “Continue” again.
Next CloudFlare assigns 2 nameservers to your site that you need to use to replace the current nameservers. Simply copy both nameservers and head back to your domain registrar to update the default/existing nameservers with the two new ones.
If you copy and paste the new nameservers make sure you don’t end up with extra spaces at the beginning or end when you paste them in to your existing registrar settings.
Note: These will remain the same for all of the domains that you add to your account.
If you’re not sure how to update the nameservers for your domain you can contact your registrar via support and ask them to do this for you.
Now go back to CloudFlare the click Continue.
You should see that the domain is set up and ready, if the “Status” is Pending it simply means that your nameservers changes haven’t propagated across the internet yet, this can take up to 24 hours, but is usually done within minutes.
Once your domain status shows as active all the traffic will be passing through CloudFlare System.
Notes: You need to determine your domain registrar, this is the company that you registered/purchased your domain name through. If you are not sure who is your domain registrar is, you can find it in from the website whois.net, simply type in your domain and then you see the results where you’ll see the registrar listed.
Each registrar is slightly different, so check the help/resources specific for your registrar for the most current and accurrate information on how to update your nameservers.
Although CloudFlare creates copies of your websites on their distributed global network, CloudFlare is not web hosting, your website should be hosted prior to getting set up on CloudFlare.
Confirm That Your Site Is Now On CloudFlare
Once your domain is shown as active on the CloudFlare Network and you have visited your site to make sure it is resolving correctly, there is one more check you can do to just to ensure that everything has moved accross and you are leveraging the CloudFlare network.
There’s a site called Open DNS that maintain a huge network of main nameservers across the internet and they will usually pick up nameservers changes quicker than your local ISP, usually within seconds.
Go to https://cachecheck.opendns.com/ and pop your domain name in the “Enter a domain name to check field”, then complete the captcha check and hit the “Check this domain” button.
It will take a few moments to run, you can see the results popping up from across lots of different locations, from across North America, New York, Miami, as well as across Europe, Australia and Asia.
What you are looking for is the two IP numbers for each location being the same. Before using CloudFlare you would just see one IP number, that being the one of your regular host. For confirmation you want to be seeing a new IP (assigned by CloudFlare) and that there are 2 identical IP Addresses.
One last thing to do is hit “Refresh The Cache” button at the bottom of the page, that forces open DNS to refresh all their servers just to make sure and the site is on the CloudFlare across their whole Network of servers.


